How To Make A Raised Flower Bed
Posted by Dillon O Callaghan on
There are a whole lot of reasons to build raised vegetable gardens — the kind that sit above ground within a frame made of wood or other material. If your land has sandy, clay-like, or hard-packed soil (or if you don’t know and don’t give a hoot about the difference), you can provide perfect conditions for whatever you’re keen on growing.
Plants are lifted out of the way of rowdy pets and little ones, and your soil warms up earlier and stays that way longer, extending the growing season and providing gentler conditions for new seeds and delicate transplants. Fruits, veggies, and ornamentals will send their roots deeper in search of water, which means a stronger foundation and improved health. And raised beds keep your space tidy. Best of all, they couldn’t be easier to make. Especially if you’re getting into growing for the first time, you’re going to want some beds of your own.
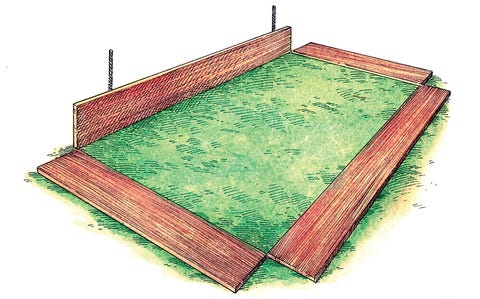
The beauty of this particular raised bed build is that it is cheap and easy to build. The wood and rebar will cost you no more than $50 if you're using untreated pine planks, and the entire build can be completed in less than an hour's time. The untreated pine might only last five to 10 years, but due to the nature of this build, each board is easily replaceable without taking apart the entire bed. For a 4-by-8-foot bed, you’ll need: • Two 2-by-12 planks, each 8 feet long • Two 2-by-12 planks, each 4 feet long • 12 pieces of rebar, each 2 feet long • A rubber mallet • Newspaper or cardboard • Soil to fill the finished frame 1. Position your boards. building a rebar raised bed on a level section of ground, lay the boards down with their inner corners touching. Stand one long board on its side, and, using a rubber mallet, hammer two pieces of rebar 1 foot from each corner, a few inches deep into the ground.
For a 4-by-8-foot bed, you’ll need:
• Two 2-by-12 planks, each 8 feet long
• Two 2-by-12 planks, each 4 feet long
• 12 pieces of rebar, each 2 feet long
• A rubber mallet
• Newspaper or cardboard
• Soil to fill the finished frame
JOHN BORGOYNE
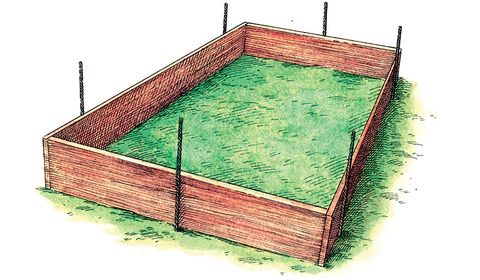
On a level section of ground, lay the boards down with their inner corners touching. Stand one long board on its side, and, using a rubber mallet, hammer two pieces of rebar 1 foot from each corner, a few inches deep into the ground.
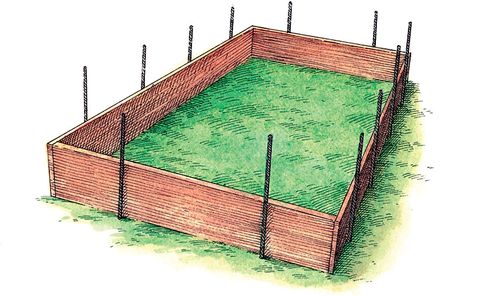
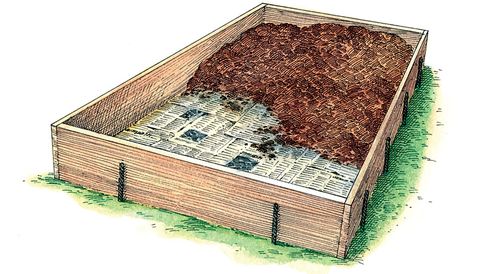
Line the bottom of your frame with newspaper or cardboard and wet it thoroughly. Finally, fill your bed with soil to within a few inches of the top.
Space
Build your beds somewhere that receives at least five to six hours of daily sunlight — the more, the better! Orient them north to south to prevent plants from shading each other out. Beds should be at least a foot wide, though no more than 4 feet across to make weeding and harvesting manageable. Six to 8 feet long is typical and cost-effective. Ten to 14 inches is an ideal height to accommodate strong roots. Leave at least 2 or 3 feet between beds for walking and wheelbarrow access.
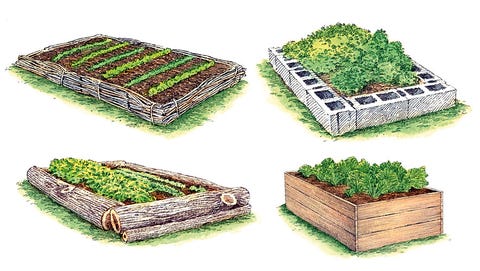
Wood
The brilliance of a plank-and-rebar design (see above) is that each individual wall is easily replaced. Try naturally rot-resistant varieties of wood, such as oak, cedar, and redwood.
Soil
You want the kind that’s dark, rich, and loaded with microorganisms. Fill your beds with a mix of 50 to 60% good-quality topsoil and 40 to 50% well-aged compost. Before each new growing season, test your soil for pH and nutrient content. If your test shows a need for additional nutrients like nitrogen and potassium, raise levels by working in amendments such as bone meal and kelp. Dress beds with an additional ½ inch of compost later in the growing season to increase organic matter and boost soil health.
Plants
If you’re building your beds in high summer, it’s not too late to plant fall crops. Sow seeds like carrots and lettuce directly into the soil, or buy mid-season transplants for crops like kale and broccoli. If you’d rather wait until next year to plant, cover the soil in your new raised beds with a mixture of grass clippings and shredded leaves in autumn — the material will compost before you’re ready to start in spring.
Water
Raised beds have fantastic drainage, which is great for plant health, but they dry out quickly. Give your plants a long drink in the early evening, but check them again on hot summer afternoons. If the soil is dry, it’s a real scorcher outside, or you live in a hot and arid climate, water again. A programmable drip-irrigation system is inexpensive and convenient, delivering consistent moisture straight to plant roots. Invest in a timer component to save money and water.
Share this post
- Tags: Cuprinol, DIY, galway, homevalue, t.o'higgins